
Logic X Pro walkthrough
As this is something many users will want to do, we’ve provided walkthroughs for Logic Pro X and Ableton Live, running on a Mac. If you are using another DAW, do not fear, enough of the procedure will be common to all DAWs that you’ll likely be able to figure out how to get Synclavier Go! operating with your workflow. If, after checking out the walkthroughs, you are still struggling, we are here to help: use the Contact Us form to ask us technical questions and we will endeavour to assist. Switch to Ableton Live walkthrough.
NB: We use “iPad” in place of “iPad or iPhone or iPod Touch” for brevity in this walkthrough. iPad is the only device that supports multiple tracks, but otherwise the procedures are very similar.
Connection to a DAW is fairly straight-forward. You can use the cable that came with your iOS device to connect the iPad/iPhone/iPod Touch with your Mac computer. You can, optionally, connect other USB devices such as MIDI keyboards, to your Mac directly or through a USB hub as you would normally. And if you have a Synclavier Knob, connect that too, straight into your computer. A typical configuration is shown below:
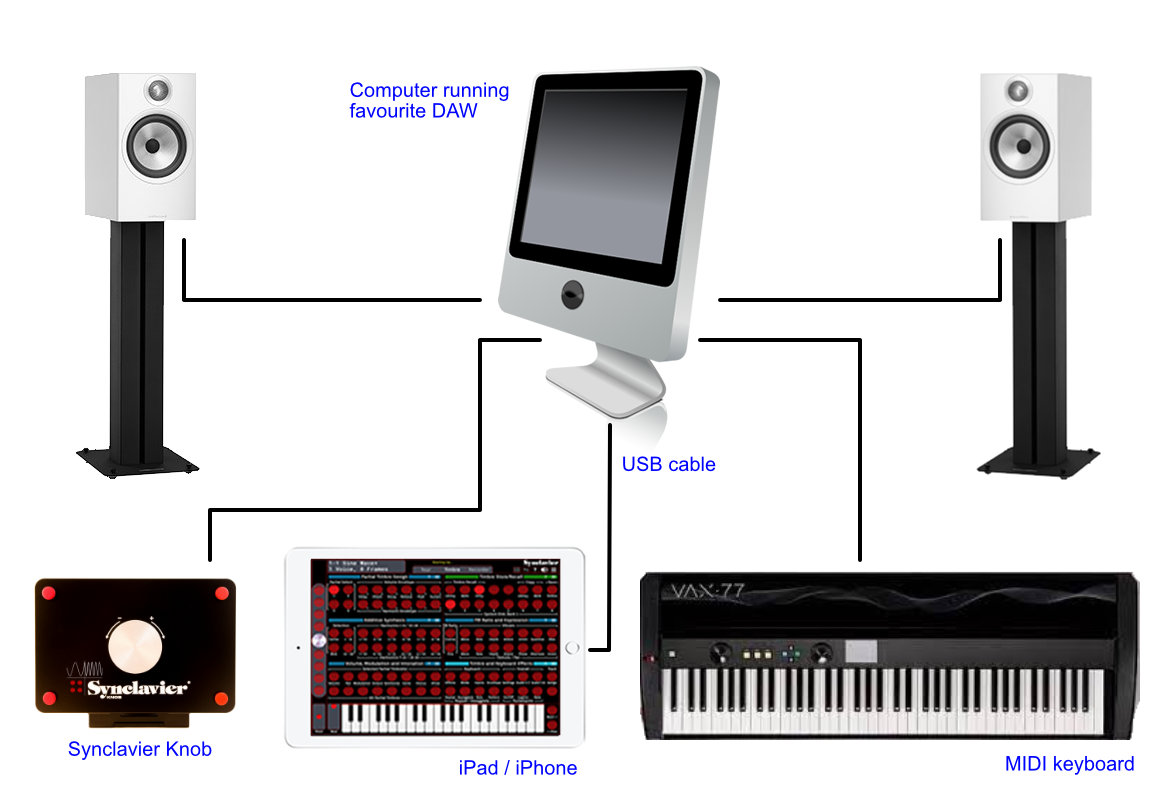
If you prefer, you can use WiFi to connect your iPad to your Mac through IDAM, but this walkthrough is going to focus on using USB, and that is the first thing to get familiar with, before jumping into wireless connections.
Steps for Logic X Pro
- Connect your iPad to your Mac using a Lightning-USB cable.
- Run the Synclavier Go! App on your iPad.
- On your Mac, run the Audio MIDI Setup application in your Utilities folder. Select Window – Show Audio Devices from the menu bar. Your iPad should be in the device listing on the left side of the main form. Click the ‘Enable’ button directly under your iPad.
- If your iPad is not in the device list, verify that your iPad is connected to your Mac and unlocked. Some USB hubs may interfere with this functionality so you may have to connect your iPad directly to your computer.
- In the Synclavier Go! App, select the Tracks tab (or its shortcut in the top left section of the screen):

- On the Tracks tab, you can turn on up to 16 individual tracks and assign timbres to that track. In the following screen shot there are two tracks selected:

- On your Mac, run Logic Pro X. For these insruction we will be starting with a new project. You will be prompted to add a new track, select External MIDI and verify that the Output is set your iPad and the MIDI channel is set to 1 (this can be changed later if desired), click the Create button.

- Repeat the above process and verify that the Output is set to channel 2. Your project should now contain two channels and should look similar to this:

- Logic Pro X is now configured to output MIDI on both channels 1 and 2.
- Add another new track but this time select Audio. The Input should be ‘Input 1 + 2’ and the Input Device should be listed as iPad. Create this track.

- Now you must create MIDI regions for both channels 1 and 2. Your screen should now look similar to this:

- In order to monitor / record the audio feed from the Synclavier Go! App, The Audio Track MUST be the selected track and you must select the Input Monitoring option, the small block with the ‘I’ just to the right on the record button on the Audio track.
- Click the play button and you should now be able to monitor and record up to 16 different timbres simultaneously from the Synclavier Go! App.
PRO-TIP: Logic outputs MIDI volume messages for each track. If you want to use these on Synclavier Go! there is a setting on the main Settings window (the three horizontal lines icon from the button panel) called “Default Pedal 1 to Volume”. Switch this on to automatically map the Channel 7 MIDI CC message (Pedal 1) to volume. You can also default Channel 11 MIDI CC messages (Expression) to FM Amount for all timbres in the Tracks tab. This saves you the hassle of mapping each individual track timbre through the Go! MIDI settings. Now you’ll be able to mix the relative volumes of your Go! tracks right from your DAW!