Ableton Live walkthrough
As this is something many users will want to do, we’ve provided walkthroughs for Logic Pro X and Ableton Live, running on a Mac. If you are using another DAW, do not fear, enough of the procedure will be common to all DAWs that you’ll likely be able to figure out how to get Synclavier Go! operating with your workflow. If, after checking out the walkthroughs, you are still struggling, we are here to help: use the Contact Us form to ask us technical questions and we will endeavour to assist. Switch to Logic Pro X walkthrough.
NB: We use “iPad” in place of “iPad or iPhone or iPod Touch” for brevity in this walkthrough. iPad is the only device that supports multiple tracks, but otherwise the procedures are very similar.
Connection to a DAW is fairly straight-forward. You can use the cable that came with your iOS device to connect the iPad/iPhone with your Mac computer. You can, optionally, connect other USB devices such as MIDI keyboards, to your Mac directly or through a USB hub as you would normally. And if you have a Synclavier Knob, connect that too, straight into your computer. A typical configuration is shown below:
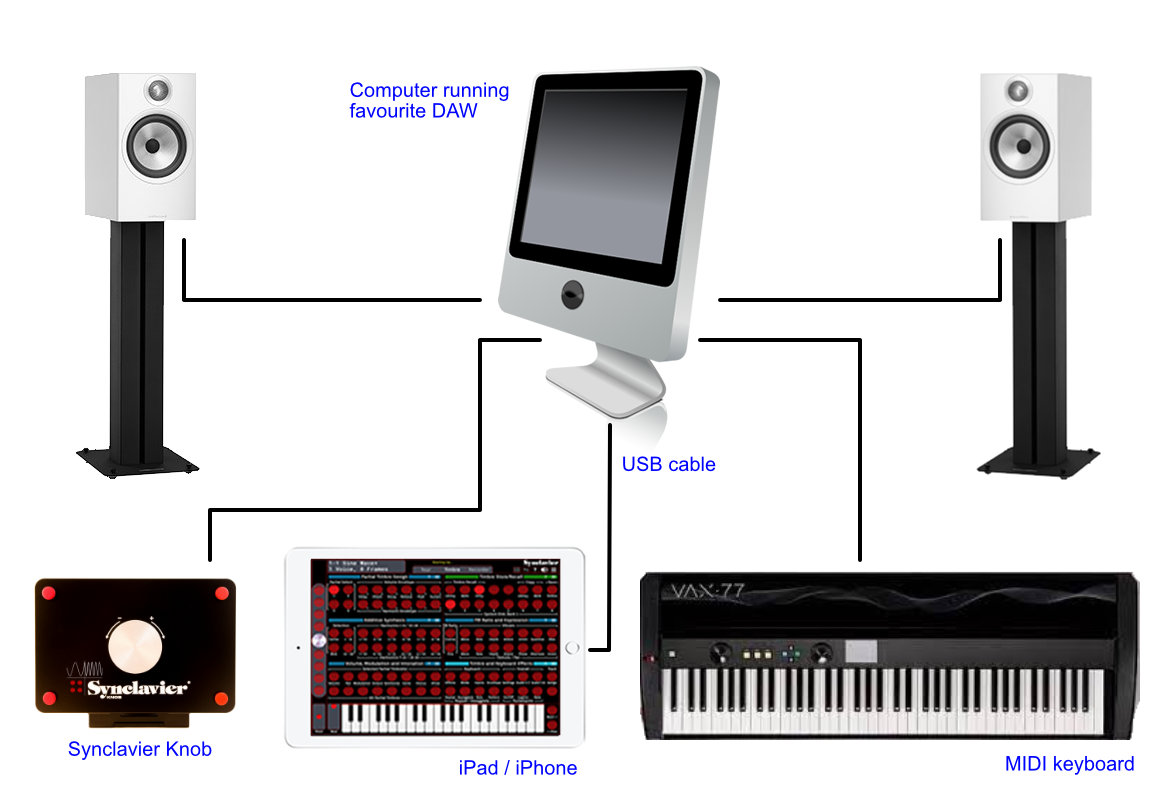
If you prefer, you can use WiFi to connect your iPad to your Mac through IDAM, but this walkthrough is going to focus on using USB, and that is the first thing to get familiar with, before jumping into wireless connections.
Steps for Ableton Live
- Connect your iPad to your Mac using a Lightning-USB cable.
- Run the Synclavier Go! App on your iPad.
- On your Mac, run the Audio MIDI Setup application in your Utilities folder. Select Window – Show Audio Devices from the menu bar. Your iPad should be in the device listing on the left side of the main form. Click the ‘Enable’ button directly under your iPad.
- If your iPad is not in the device list, verify that your iPad is connected to your Mac and unlocked. Some USB hubs may interfere with this functionality so you may have to connect your iPad directly to your computer.
- In the Synclavier Go! App, select the Tracks tab (or its shortcut in the top left section of the screen):

- On the Tracks tab, you can turn on up to 16 individual tracks and assign timbres to that track. In the following screen shot there are two tracks selected:

- On your Mac, run Ableton Live. For these instructions, we will be starting with a new Live Set. The first thing to check/set is your audio output. Bring up the preferences window (CMD , on a Mac). Under the audio tab, select your preferred audio output, in the Audio Output Device drop-down list. “Built-in output” refers to your computer’s built-in speakers or headphone jack, and it’s sufficient to use to test our setup.
- You should also select your iPad from the drop-down menu for Audio Input Device. Notice when you do, that the stereo selector on top track on the main screen, entitled Audio, changes from being grayed-out, to being selectable. Dismiss the preferences window.
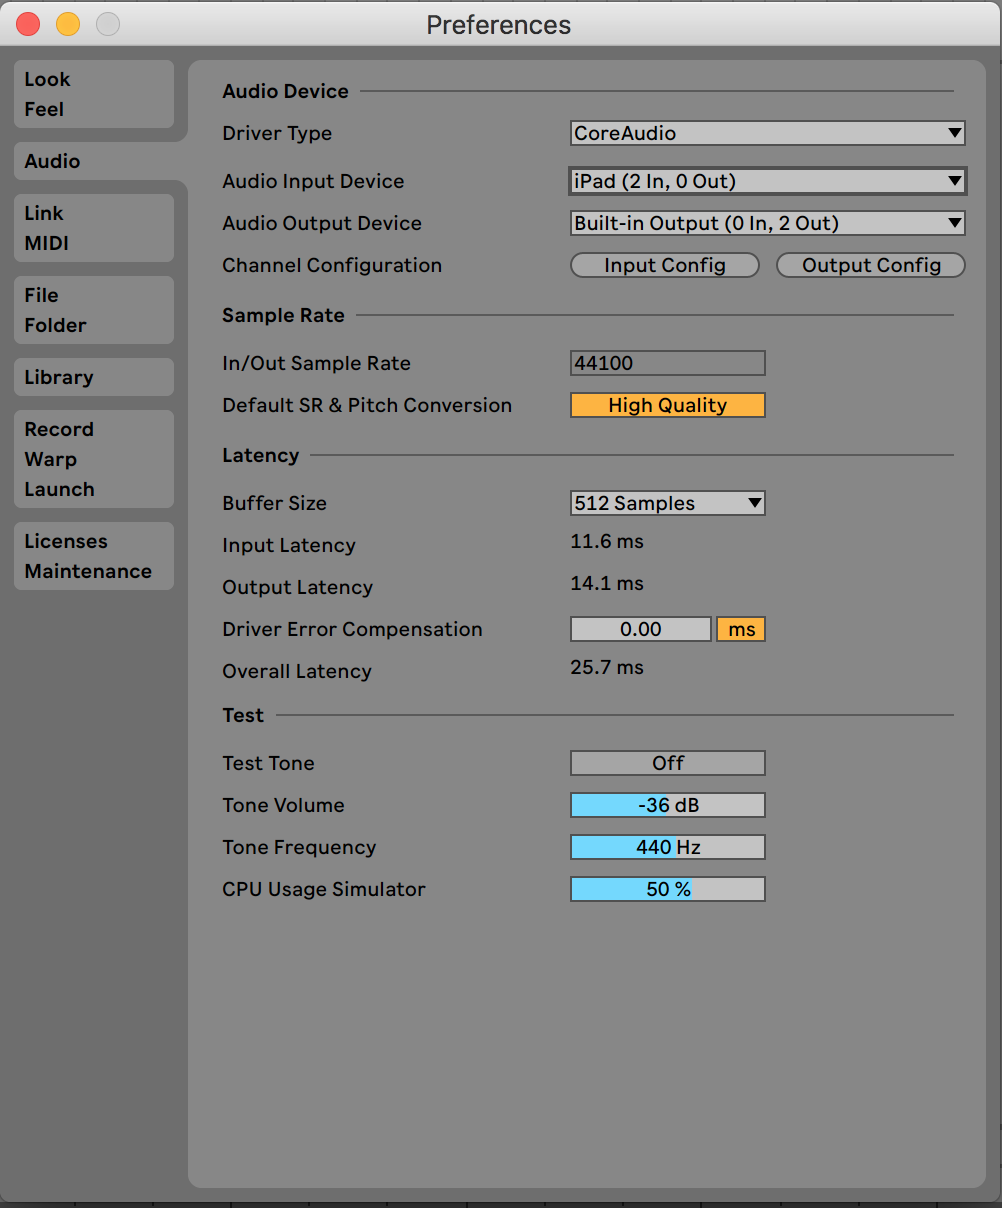
- Click on the round icon at the top-right of the Audio Track to enable monitoring of this audio track.
- Since we’re just using Go! so far in this Set, this track can be our master audio, so it’s a good idea to explicitly tell Ableton Live this is an input, so click on In, changing the track from Auto or Off. Now, you’ll hear whatever audio comes back on this track and you’ll only need to record-enable this track when you’re ready to record the audio.
- Now, if you press a key on your iPad you should be able to hear the sound on your computer.
If at this stage, you are not hearing audio through Ableton Live, you should open the Audio Setup screen on Synclavier Go! (click the speaker icon from the top-right panel of buttons). The available outputs are listed on this screen. In this scenario, you should see USB IDAM Out 1 and USB IDAM Out 2, representing the InterDevice Audio and MIDI stereo channels. This should be switched on. If you don’t see this, check you enabled your iPad in the Audio MIDI Settings, as outlined above. You’ll have to do this each time you disconnect your iPad’s USB cable.
The Test Tone button creates audio output from the app, regardless of which timbre is selected and its settings, so this is a useful diagnostic feature for audio. Press and hold to hear a tone. Also, the Multi-route option can be useful in configurations where the iPad could see multiple audio outputs. This will enable all of them, rather than the last one plugged in. Plug in a set of headphones into the headphone jack of the iPad if you want to investigate how these settings work.
Also on this screen is a latency slider. Ordinarily, you would want latency through your system to be as low as possible. In instances, where you have a lot of equipment in your music production set-up, possibly older MIDI equipment, latency may be unavioable. The latency slider on Go! allows you to introduce latency from your iPad so that you can match the latency of other synced equipment. For this test, set it to around 1ms.
- In your new Live Set, underneath the Audio track will be one track entitled MIDI. We can use this to send MIDI to Synclavier Go!, but we would be wise to add a keyboard to Ableton Live first. So connect a MIDI keyboard to your Mac.
- By default, the MIDI track will be set to All Ins and All Channels, so if you tap a key on your MIDI keyboard, you should hear a note on your computer audio. Try this now.
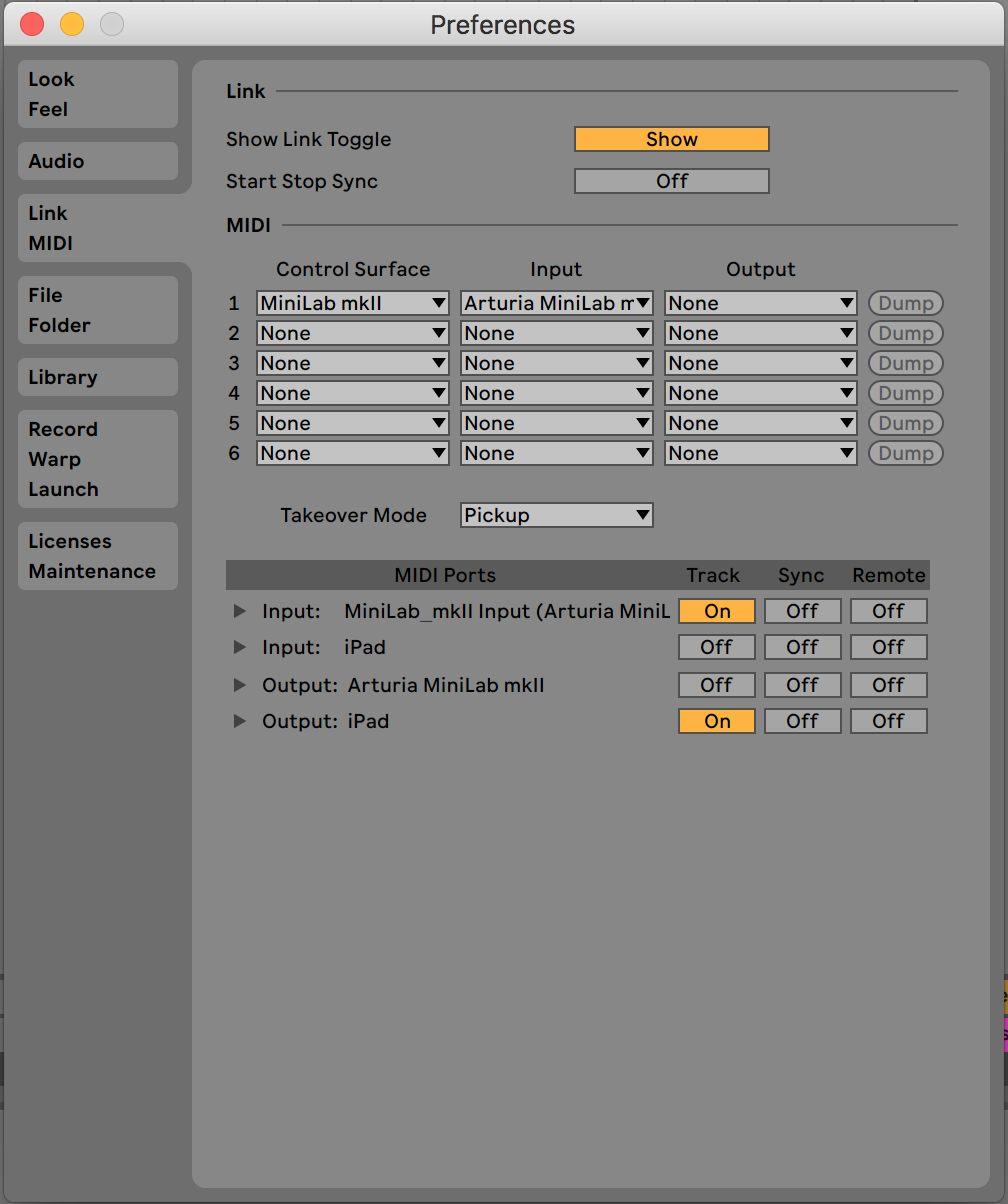
- To send this MIDI information to Go! we need to configure the MIDI track. Select the drop-down list that reads “No Output” and click Configure… This brings up the preferences window again on the MIDI tab.
- The Control surfaces should look like the screenshot below. It should list your MIDI keyboard in the 1 slot, and its output should be set to “None.”
- The MIDI ports should also look similar. You need to ensure that your keyboard is enabled (On) as a Track output and your iPad is enabled (On) for Track output. Dismiss this screen when you have set it up accordingly.
- Make sure iPad is selected in Output drop-down list of the MIDI track. Now arm the MIDI track — click the little button in the top-right of the MIDI track and it will turn red to show it is record-enabled.
- Now if you press a key on your keyboard, you should hear the sound of Synclavier Go’s timbre associated with track 1.
NB: There are two methods in Ableton Live to manage MIDI messages to external hardware (iPads are considered external hardware). This walkthrough just outlines the track method, but if you have Ableton Live Standard or Ableton Live Suite, you can use the External Instrument Device which maps MIDI and Audio effects to the same track. More information can be found on the Ableton website.
If you are not hearing a Synclavier timbre when you hit a MIDI keyboard key, you should check on the Tracks tab that a suitable timbre is selected and enabled in the MIDI channel 1 position. You should also check it’s volume is set at a sensible level. The MIDI Settings window on Synclavier go, accessible from the Tracks tab, or from its shortcut (the icon with the arrows on the top-right panel of buttons) shows your MIDI connections. This is a useful diagnostic window, especially if you have a complicated set-up with many MIDI interfaces possibly connected to your iPad. In this test scenario, you should just have one MIDI interface (input) which reads IDAM MIDI Host and it should be switched on.
Another thing you can try, if you’re not hearing Synclavier Go! timbres, is to change the MIDI track setting from AUTO to IN so Ableton Live knows explicitly what to do with this MIDI data.
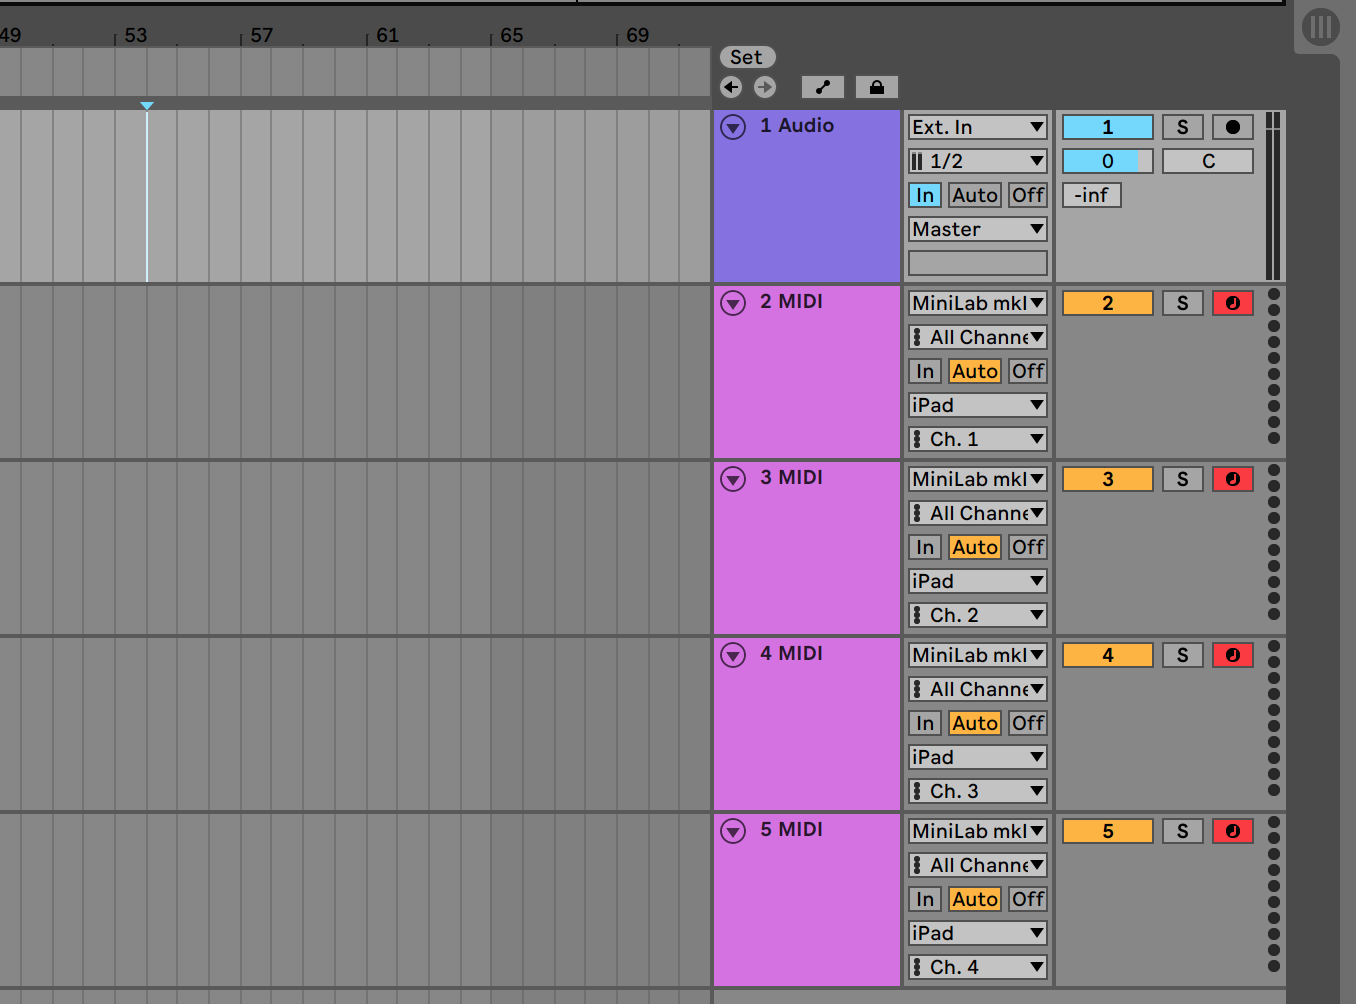
- You can continue to add MIDI tracks to your Live Set. Go! supports up to 16 MIDI channels of polyphonic timbral action. The quickest method to add tracks is to right-click on the track in Live and select Duplicate (the shortcut on Mac is CMD D). Then using the bottom drop-down-list, you can change that track’s MIDI channel. (the below screenshot shows four MIDI tracks heading into Go!) And don’t forget to add your preferred timbres to the Tracks tab of Go! Switch them on to enable them, and tap on the names to change the timbres. When you are happy, you can save that set of tracks as a custom Mix.
- You can hold the CMD button and click the record-enable buttons to arm all the tracks. Now when you press a keyboard key you will hear all selected timbres sound at once.
- Ordinarily, you will want to sequence these tracks separately. So, you would arm whichever track you are working on, and hit the record button from the top panel of Ableton Live. Play your sequence with the keyboard and press stop when you’re done. Double-click stop to return to the beginning and repeat the process on another track.
NB: If it’s not already selected, you’ll want to select “Reduced Latency When Monitoring” from the options menu of Ableton Live.
And that’s it, you’ve successfully added Synclavier to your DAW workflow. You should save the set somewhere safe, so you have this as a template to return to whenever you want to use Synclavier in Go! with Ableton Live.
Synclavier Knob
If you are fortunate to own one of our Synclavier Knobs, you can also use this within a DAW workflow. Here are the steps necessary for routing your knob through Ableton Live:
- Connect your knob’s cable to a free USB port of your Mac (or USB hub connected to your Mac)
- If you have your MIDI tracks set to “All Ins” then when a track is record-enabled, you will be sending MIDI from the keyboard and the knob to iPad via that channel. Synclavier Go! will recognise this data and know what to do with it.
- Try this now, record-enable a track and then turn the knob. You should see the knob on Synclavier Go! screen move in unison.
This approach is useful for most scenarios. But if you have multiple MIDI inputs, you may have MIDI tracks set to specific MIDI devices or channels. In which case, you can use a separate track to route your knob messages. The procedure is as follows:
- Add a new MIDI track (or duplicate from an existing one). Set the input to Synclavier Knob. You can keep it at all Channels, or set it to channel 1.
- Set all the other MIDI tracks input to your keyboard or other control surface you want to use. The outputs will remain set to iPad for all tracks to route to Synclavier Go!
And there you have it, you should be able to use Synclavier Knob and Synclavier Go! in harmony with your DAW.
It’s fairly simple, but if you are experiencing issues, you should check the preferences window of Ableton Live. Synclavier Knob doesn’t need to be listed under the control surfaces, but it should appear under the MIDI ports section. Of course, it should be switched ON as an input and OFF as an output. Another thing to check is the MIDI Settings window in Synclavier Go!, accessible from the Tracks tab or its shortcut button (small icon with the arrows). When connected to a DAW, you should see the MIDI input Synclavier Go listed as “IDAM MIDI Host.” Next to this, the red button with the image of the knob should be lit. This is the map pitch-bend messages to knob function, and since Synclavier Knob encodes its signals as pitch-bend MIDI messages, if this is not selected, turning the knob will instead vary the pitch of the selected timbre. In some cases, this might be what you want, of course.