Connection Guide
There are a few different ways that you can connect Synclavier Go! to external audio equipment. What configuration you chose will depend on a few factors, such as your available equipment, your preferred workflow, and your current situation (i.e., on tour could be different to in the studio, or bedroom, or basement or, well you get the idea — these are portable devices after all).
On this page, you will find some typical configurations. On occasion we will link to a third-party product. This isn’t necessarily a brand recommendation, it’s more of an example of what you can connect,
MIDI Keyboard
Synclavier Go! has a built in keyboard that’s useful to test sounds, but has its limitations in performance. This is more obvious with the smaller built-in keyboard of an iPhone. Therefore, we recommend using a MIDI keyboard with these products, if budget allows.
If you want to keep with the portability of an iOS-centric music production studio, you could use a bluetooth keyboard. Less wires = less hassle.
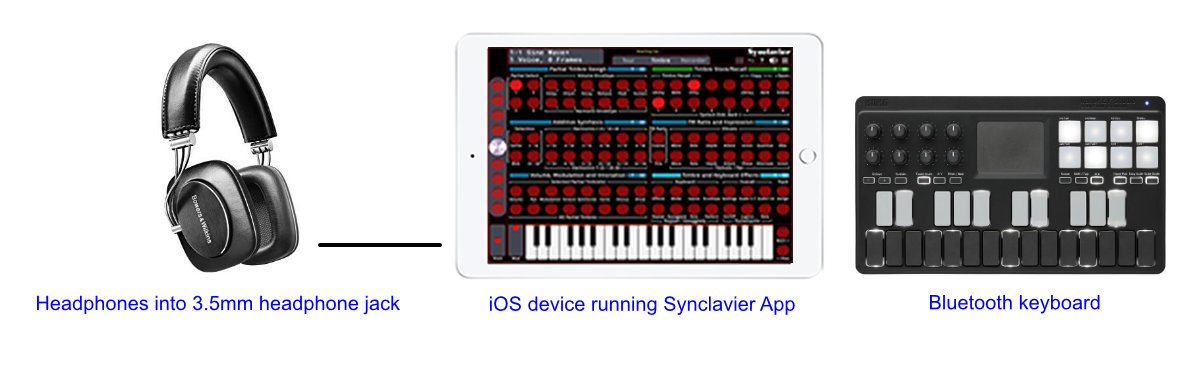
Other options are MIDI keyboards with a USB interface, or older MIDI keyboards with a 5-pin MIDI out connection. For the latter, your best bet is to acquire a USB Audio interface with an old-style MIDI connectors, such as the Roland Rubix 22 or Zoom U44.
USB Connectivity
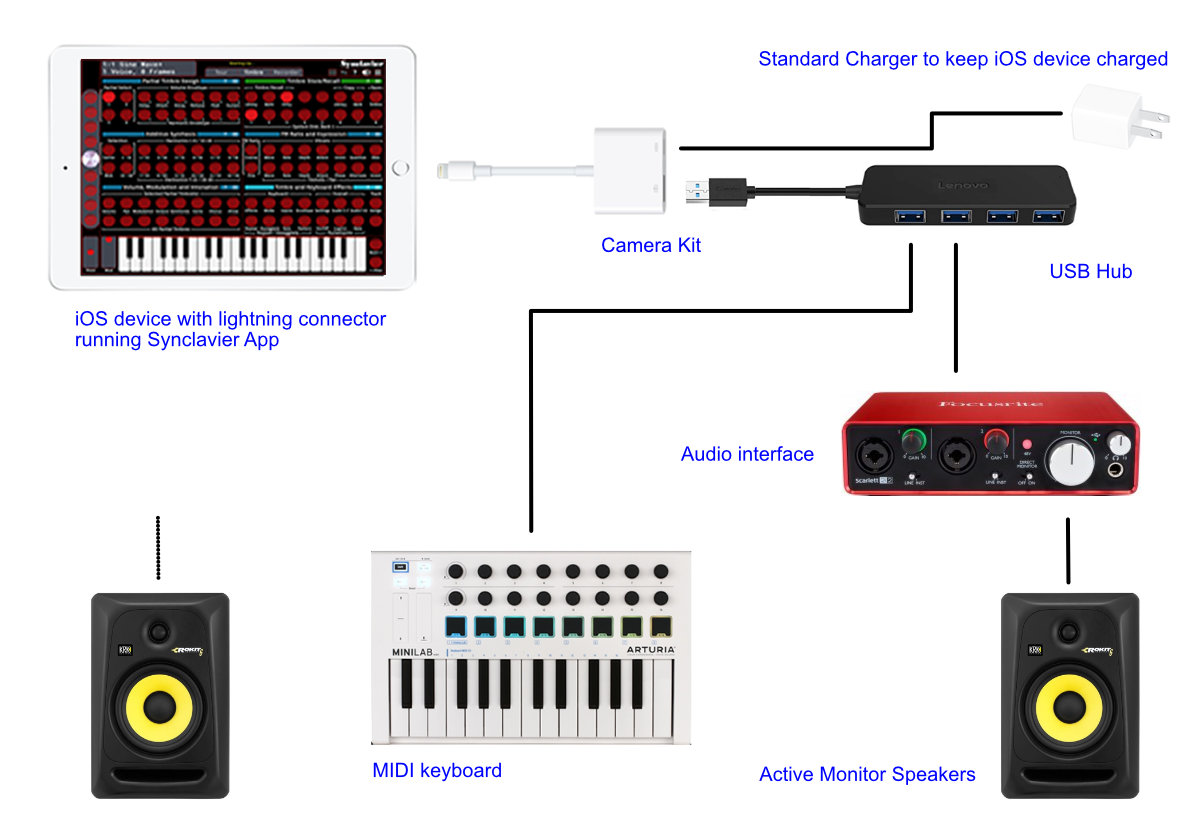
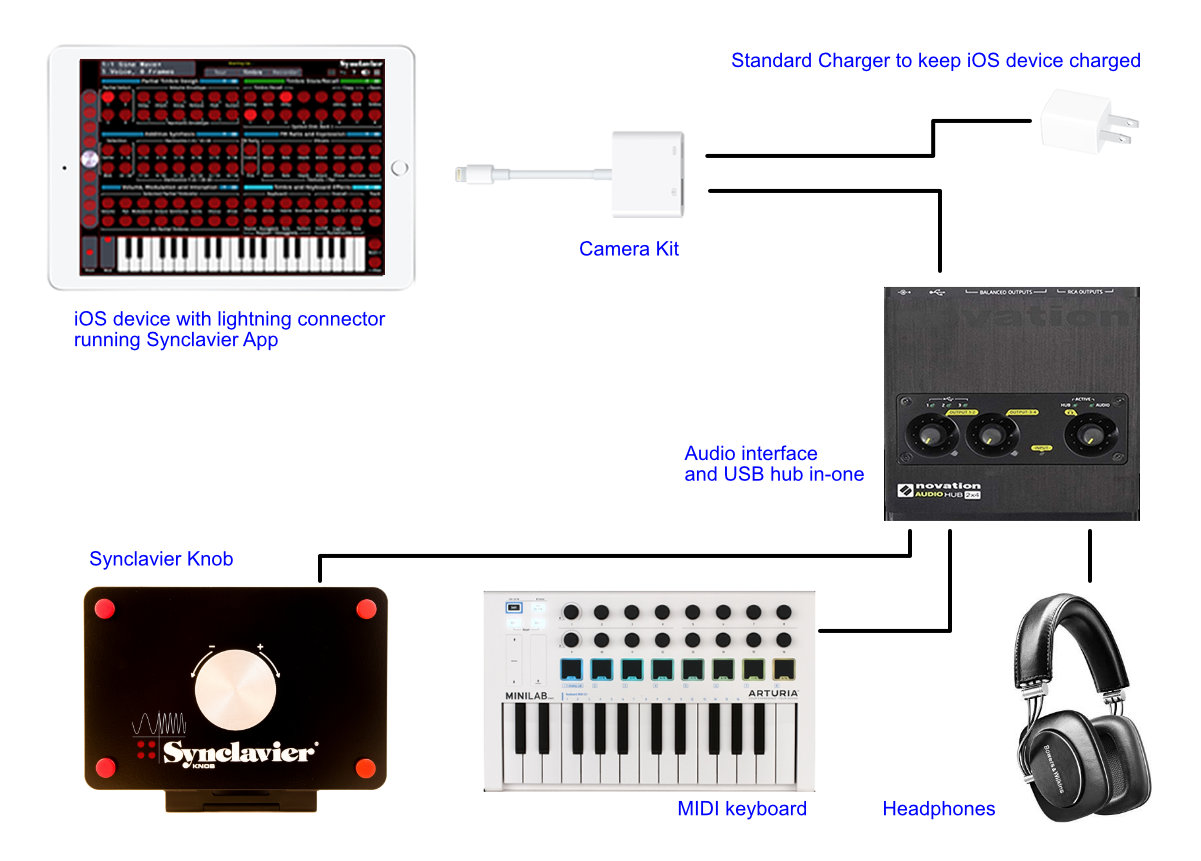
If you want to connect USB devices such as MIDI keyboards and Audio Interfaces into your iPad, iPhone, or iPod Touch, you need the correct USB connectors. For the latest generation of iPads — ones that have a USB-C port — you’ll likely need a USB hub, such as this product. For the previous generations of iPads and iPhones — ones with a lightning connector — you will need to use what’s called Lightning to USB Camera Adapter. It’s called a camera adapter, because connecting a camera is the main use of these devices, but what they effectively do, is turn your iPad/iPhone into a USB host, rather than a client, so they can also be used to route MIDI over USB.


You can buy camera adapters with or without a power input. Since iPads and iPhones only have one input jack, if you use it for a camera adapter, you won’t be able to keep your iOS device charged. This is especially important if you’re connecting devices such as a MIDI keyboard, since that will draw its power from the iOS device. Therefore, we recommend getting the camera adapter with the power input. You don’t always have to plug power into it, but it’s nice to have that option.
Now you can connect class-compliant USB devices, such as MIDI keyboards into Go! When you connect a MIDI keyboard, it should be recognised immediately by Go! You should be able to play a note and hear it. If you play a note in its range, the virtual keyboard will animate as if you pressed that key. You can check the status of MIDI i/o at any time by pressing the connections menu button on the top bar of the app (it’s the button with two arrows going left and right). If your keyboard supports it, Go! responds to velocity, pressure, pitch bend, mod wheel, in addition to note pressed, and some CC inputs (currently pedal and expression).
Audio Output
Once you have MIDI input, the next step will likely be to get some audio output. The built-in speakers have their limits too. If you are on-the-go, a good pair of headphones will serve you well.
Another option for getting audio from Go! is a USB-Audio interface. There are countless audio interfaces on the market that support USB audio, each aimed at a different level of the market, from amateur to pro, so your budget will dictate what audio interface you start out with. While you could use the headphone jack to interface to other audio equipment, such as a mixing desk, studio monitors, a four-track recorder, you’ll get a cleaner signal by using a USB audio interface, since the output of a headphone jack doesn’t match the input-impedance of line-in audio equipment.
If you’re using a camera kit, it only has one USB port, so to add more than one device, you’ll need to add a basic USB hub to your set-up.
USB hubs are relatively inexpensive, and you may already have one kicking around. Again, we would recommend a USB hub with the option to power it from an adapter, since when you start to add devices, you can quite quickly reach the current limit. Some audio interfaces, such as the Novation 2×4 AudioHub contain a built-in USB hub, but these are getting few and far between. Of course, if you have the latest generation iPad Pro, you just need one piece of kit — a USB-C hub, rather than a camera kit and a USB hub.
Here are some examples of audio interfaces you could use with Synclavier Go! Basic Advanced
So, now you’re ready to get audio from Go! Again, the menu buttons are your friends, this time the one with the icon of a speaker, will bring up the audio settings. It will show you what audio interfaces are connected and give you the option, if there is one, of which interface to route the audio to. If you want to route to more than one device, select the Multi-Route option.
Go! support one stereo audio output, at 44.1kHz or 48kHz sample rate, selectable. A word of warning here: if you have a problem getting audio out or MIDI in, often the order in which equipment is connected affects it ability to — well, connect. Some equipment is more sensitive to this, so if you run into problems, just disconnect and then reconnect in a different order and you should have things working correctly. And if you still have issues, use the Multi-Route option.
Once you have keyboard input and audio routed to your desired output, you should be up-and-running: there you have it, a portable sound design rig.
Synclavier Knob
When you have been using Synclavier Go! for a while and are getting into sound design, you are likely to complete your set-up with a Synclavier Knob. This hardware product is available from the Synclavier Digital website or Noisebug if you are in the LA area.
The Synclavier Knob, has been re-engineered from the original control knob of the Synclavier II. The weight and feel of the knob is identical, and when you turn it left or right, the soft-control on Synclavier Go! moves accordingly. Many users will find this authentic experience easy and quicker to manipulate accurate values than the simulated knob. It’s been said elsewhere, but it bears repeating that with Synclavier Go! and a Synclavier Knob you can have what amounts to a very desirable Synclavier set-up.
It’s easy to add a Synclavier Knob to your set-up. It can be connected concurrently with a MIDI keyboard, through a USB interface.
AUv3 Client
Synclavier Go! comes packaged with an AUv3 client. The client can be loaded into a DAW multiple times. Each client can have a different preset timbre. The client receives MIDI note information from the AUv3 host and then send back audio. Synclavier works well in NanoStudio2 and GarageBand DAWs, but there are many other AUv3 hosts to chose from.
InterApp Audio
Synclavier Go! supports InterApp and InterDevice Audio. Go! is multi-timbral and supports the triggering of up to 16 tracks simultaneous. More information on this is given in the manual, but in short, if you press the track button in the top-left of the screen of Synclavier Go!, you can select which track you’re currently affecting, then map a timbre to it. If you have other audio apps on your iOS device, you can route MIDI and audio between Synclavier and the other apps. We support Audiobus, since this is a well-established, and frankly great, way to do this. It has a simple visual interface. Please refer to Audiobus documentation for more info on this.
InterDevice Audio
InterDevice audio support means Synclavier can communicate to other devices, receiving MIDI and sending audio. Other devices could be on a network (wired LAN or WiFi), bluetooth, or connected through USB. The way Synclavier sees the other equipment is the same regardless of connection method. A word of warning: it might not be as convenient, but the more “wired” you are to the other equipment, the less latency you will experience; i.e., if you can connect through a USB connection, there will be less response delay than if you connect over WiFi; so chose the connection method that suits your needs.
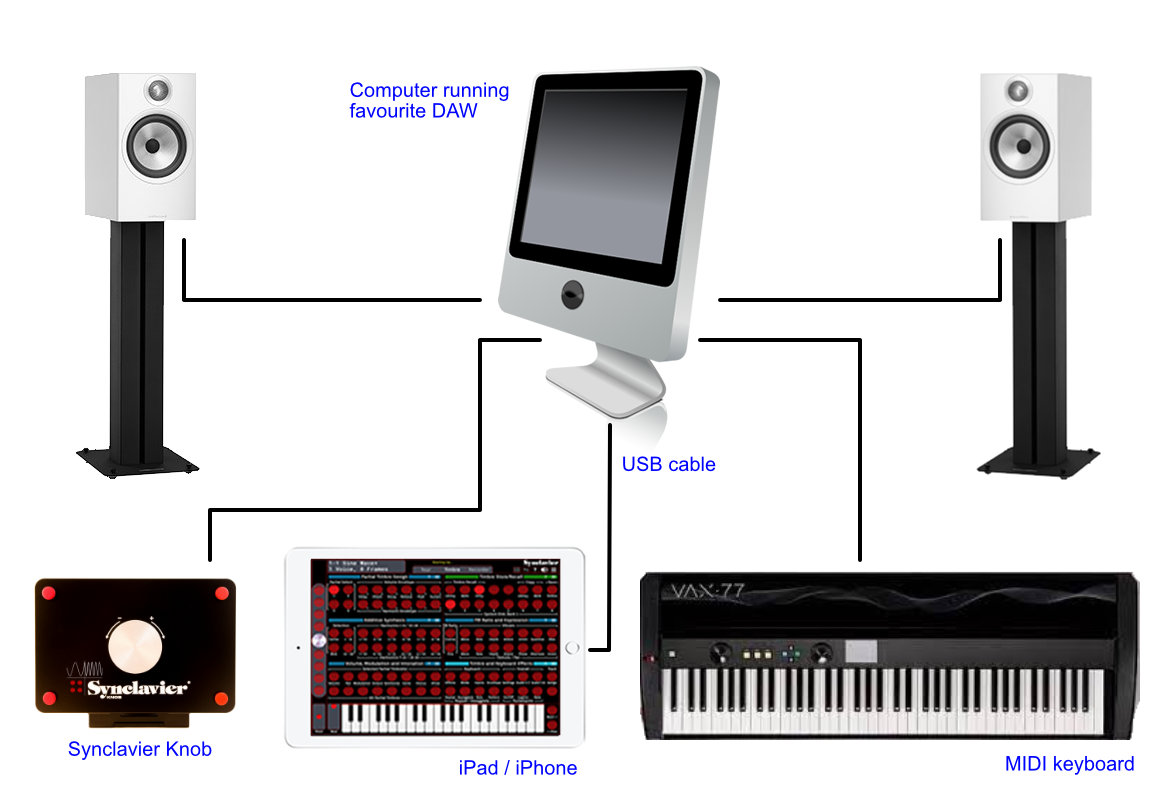
Connection to DAWs
One outcome of supporting InterDevice audio, means you can connect Go! to a DAW without much additional equipment. If you already use a computer-based DAW as part of your music making workflow, then you can connect your iPad or iPhone to your computer with a standard USB cable. And that’s all you need. No camera kit required. The iPad or iPhone acts like an external synth box. You can connect your MIDI keyboard to your computer. You can map channels in your DAW to send MIDI to the Synclavier, and receive audio back from it. With a suitable stand, for your iPad or iPhone, you have a very useable synth set-up. To configure this on a Mac, run the Audio Midi Setup application, find your iPad in the left hand panel, and click enable. Now you can modify the settings of your DAW to route MIDI and audio accordingly. For connection to Windows PC, you may need to use Wireless MIDI or bluetooth, please search for instructions on how to do this on the internet.
DAW walkthroughs
As this is something many users will want to do, we’ve provided walkthroughs for Logic Pro X and Ableton Live, running on a Mac. If you are using another DAW, do not fear, enough of the procedure will be common to all DAWs that you’ll likely be able to figure out how to get Synclavier Go! operating with your workflow. If, after checking out the walkthroughs, you are still struggling, we are here to help: use the Contact Us form to ask us technical questions and we will endeavour to assist.